Werowance builds a webster

Home Model Engine Machinist Forum

Help Support Home Model Engine Machinist Forum:

This site may earn a commission from merchant affiliate links, including eBay, Amazon, and others.
this weekend didn't produce very many parts. the tiller broke down - front input shaft bearing failed and put a roller into the gears which took most of my weekend. still waiting on a seal before I can complete the repair on that. but here is what I did get done.
used a piece of 260 (I think that's harder than 360?) brass thick walled tube that I had left over from another project (if the tube looks bent - its because it is. it was just some scrap in my tool box). I band saw cut 2 thin sections one for a spacer and one for a washer. both were finished up on a improvised surface plate and fine sandpaper. that washer was super thin. I also ordered my self a new tool. a 7/8 oversized er-32 collet. wanted one for a while now and I think it will come in handy for finishing up the piston.
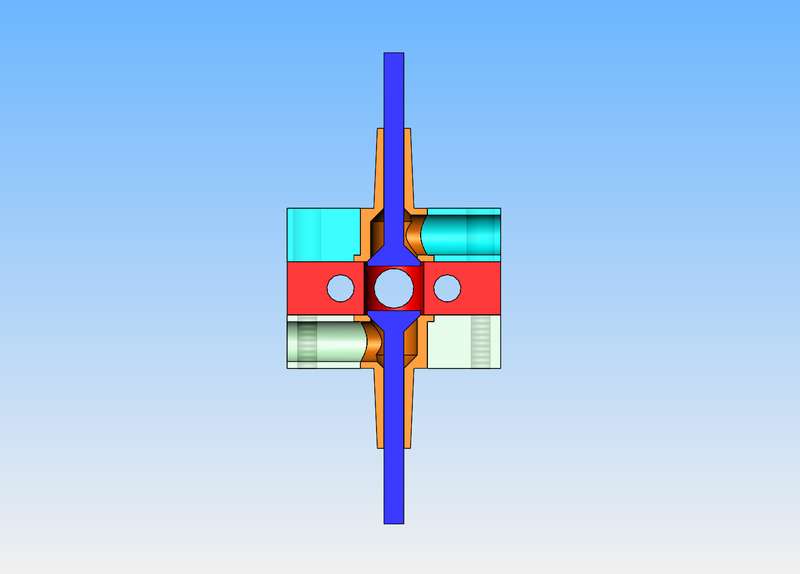
upload_2019-6-17_15-39-14.png


upload_2019-6-17_15-41-2.png
 
i didn't have a 6-32 or a 5-40 shcs but what I do have is about 35 ft of 3/8 stainless steel rod that was given to me. so what I did was turned it down a bit, knurled it and made the tappet screw out of that. figured the knurl would be easy to hold with fingers when tightening up the nut on the bottom. made it a bit longer than plans but I will cut the extra threads off on final assembly. I know it wasn't much but at least a part was made last night.
upload_2019-6-18_8-54-9.png


upload_2019-6-18_8-54-32.png


upload_2019-6-18_8-54-59.png


upload_2019-6-18_8-55-19.png
 
(This is just a comment so that HMEM updates me when the thread updates)

I like the screw! Good idea. I don't have any stainless rod and was going to just order some 6-32 SHCS from Bolt Depot or someone.

On the spacer and washer, I have some 1/4" brass rod here I've had for a long time. I was just going to part off the two pieces on my micro lathe. Hadn't thought of the homemade surface plate idea.
 
the scrap piece of brass I had was deformed on one end so would have been difficult chuck up for parting off. but bandsaw and rolling the brass with the cut worked well. my homemade surface plate this time is just a piece of marble floor tile. I often use a piece of glass to for that to, I know its not the most accurate surface plate but it works well for me.
 
started cutting out the valve blocks last night. I want to glue them all together and cut them like that. I'm wondering, normally I would use red high strength locktight to do it but wonder if this new 638 locktight would be better to glue them together for cutting (new to me)? I'm getting into the parts I sort of was not looking forward to. valve cutting and finishing up the piston....

upload_2019-6-19_11-33-29.png
 
Can't advise you on that one. I have never had luck gluing parts together to hold temporarily while I perform any kind of work on them. After having things come unglued right in the middle of operations a couple of times, I quit doing that. Now I weld the pieces together or bolt them together.
 
so im on vacation this week and have ate more bbq beef and pork than most hogs and cows have in their life :). but all I have managed to get done is hog out to much off the valve block stack. so tonight I got started on a new stack and hope tomorrow I have some progress. also got that tiller all back together and the garden back in better shape. zucchini squash lettuce and onions for dinner tonight. had to get rid of the meat sweats. its been a great week.
 
so im on vacation this week and have ate more bbq beef and pork than most hogs and cows have in their life

That's because cows and hogs are vegetarian and don't eat bbq! But seriously, if you want to talk barbecue, we need to open another conversation elsewhere. It's one of my main hobbies these days.

Zucchini is OK if you hollow one out and fill it with pulled pork.
 
got the center block done. now I have a question on the top and bottom blocks. looking at the plans, the hole drilled into the side through the brass valve guides after being pressed in looks to be very close to where the valve seat will be. those who have built this engine, did you see the same thing or is there plenty of room? if not then I was thinking drilling slightly smaller for that just to be safe.
then on the next subject , I believe it was Bob who mentioned his counter sincs left sort of a chater mark finish and I wanted to point out that mine do the same. first I thought it was just because I was using my drill press to do the counter sinc but this time I used the mill with everything tight and the finish was the same. just curious if there is a technique to prevent this or if it is just the type of countersink I am using. waiting on my 1" 2-56 screws to arrive so right now I just have a couple 1/2 long screws in there to keep the top block aligned.

upload_2019-7-3_8-52-25.png
 
It's been a while since I used my countersinks but they certainly never left a chattery finish like that. I haven't got any pics handy but from memory the countersink holes don't show any chatter at all.
 
Since nobody else spoke up, here's my big countersunk hole in the base plate. I'm using the Irwin countersinks that werowance links to in post #14.
The smaller countersinks leave the same rippled appearance.

Big_Csink.jpg


This is a different countersink from the small one, so it's not the cutter itself, but I don't see how it could be. I thought if it was chatter to increase the speed of the cutter so I doubled the speed of my drill press. No effect - neither better or worse. Since it's a manual drill press with far too much slop in it, I thought it might be that until I saw the pic above. I don't have a solution for this, but maybe a grinding point?
 
and I came to a stopping point yesterday. I don't have a .094 reamer to do the valve guides so I am ordering one today. might switch over to finish up the piston this weekend. but did mange to get the aluminum pieces of the valve blocks done with the exception of the intake or exauhst hole drilled after pressing in the valve guides/seats

upload_2019-7-5_9-33-30.png
 
Since nobody else spoke up, here's my big countersunk hole in the base plate. I'm using the Irwin countersinks that werowance links to in post #14.
The smaller countersinks leave the same rippled appearance.

View attachment 110048

This is a different countersink from the small one, so it's not the cutter itself, but I don't see how it could be. I thought if it was chatter to increase the speed of the cutter so I doubled the speed of my drill press. No effect - neither better or worse. Since it's a manual drill press with far too much slop in it, I thought it might be that until I saw the pic above. I don't have a solution for this, but maybe a grinding point?

Sometimes a slow speed & plenty pressure works out (?)
 

Latest posts

Back
Top