BAZMAK-A very,very useful Vise for the benchmill

Home Model Engine Machinist Forum

Help Support Home Model Engine Machinist Forum:

This site may earn a commission from merchant affiliate links, including eBay, Amazon, and others.
Joined
Dec 12, 2012
Messages
2,220
Reaction score
1,285
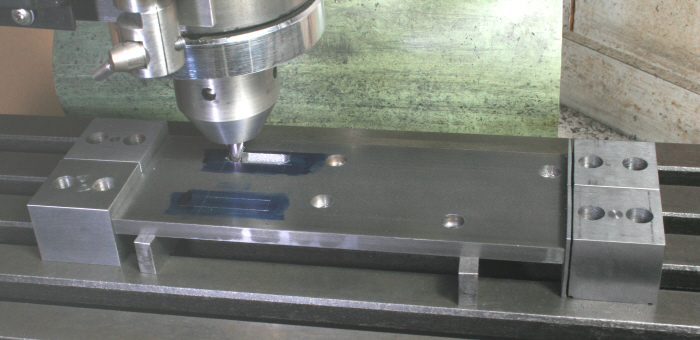
Will give a brief description of my latest project with photos mostly self explanatory.An independant 2 jaw vise for the benchmill Cheap and easy to make and very useful.Low profile 35mm high.4.5" wide jaws opening to 12"
Basic principles have been around a long time.I remember as a young apprentice different versions being used on large Plano/Millers etc using the tee slotted tables to grip large irregular shaped castings etc.This one i made from bits of scrap.Details,dims and matls can be decided upon to suit your own requirements
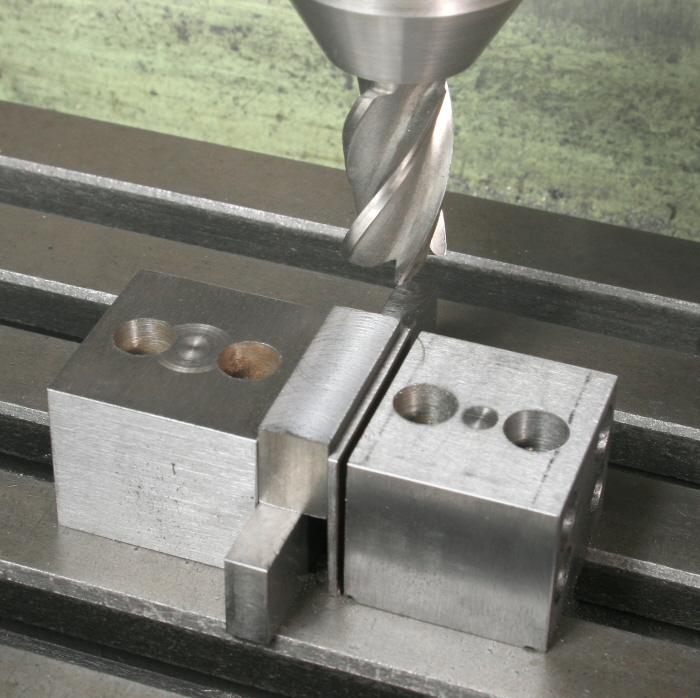
The fixed jaw i made from 50x50x8 angle x 115lg,shaped and slotted to pick up
the 3 T slots.2 stiffening gussets were welded on and a 12w x 3dp slot to the u/side with a 12sq key fitted.A removeable jaw was was made from 40x12 flat and fixed with 3 no M12 cap screws
The adjustable jaw was also made from 50 angle with a 50x10 lat welded on.No gussets slotted the same with the 12sq key fitted.The moving jaw was made from 40 x 16 flat. Drilled and reamed for 2 no 10mm guide pins
The Screw was made from a 1/2W bolt the end turned down and grooved
to fit a 5mm ball locked in with a grub screw.Adjustment only needs to be 10/15mm.With the jaw open the two units can be set approx 5mm larger than the job with nom 5mm or so fo clamping.Final job was to skim the top of the vise jaws and mill a 10w x 4mm dp slot on the joint line.Additional
jaws can easily be made and say Veed for round bar etc.Will let you know when i use it.If i was starting again i would use a a longer leg angle say 65mm
that bolts to the table with the 35/40 high leg as is
 
Hope you don't mind if I copy it for my X3.
Thanks, I've been pondering that lately too.
Rich
 
No problems glad to be of use.Suggest you make the angles 65x50x10?
Guide pins need to be close fit in reamed holes.I tack welded together then drill/reamed all before splitting.Everything else is as you wish.Post when done
 
I also have the same mill sometimes the most simple ideas are the best I will also be making a set ..keep up the great work
cheers clem
 
When I purchased an old Burke No4 mill I didn't have a vice so I made one quickly using scraps and long T nuts. My clamping jaw had two bolts for tightening and the jaw pressure plate has a hold down bolt with separate T nut beneath. After clamping the piece I tighten the hold down bolt and it eliminates any upward jaw movement for a super tight grip. I have a newer vice as well for small work but with this simple vice I can clamp large pieces easily. It was my first project using the old mill and clamps to make a vice so the vice has become a treasured keeper.

IMG_0264 (1).jpg


IMG_0268 (1).jpg
 
I LIke it.Good of you to share.Any comments or potential improvements
can be posted and with everybobys input maybe we can come up with Mark 2
 
I like the vice Bazmak, nice design and a substantial piece of kit. Should anyone be looking for something similar in principle but lighter weight then my High Profile Clamp/Two Piece Vice may fit the bill. See here for details including dimens ioned drawings-- http://www.homews.co.uk/page127.html

The term High Profile Clamp my confuse you but this is explained on the link above

Harold Hall
 
Tanks Baz. Another one on my " to make" list.
 
Just to complete a submission of design ideas for Version 2, here are two more pictures. The first shows my normal set up with small precision vice in the middle and the home made vice parked at the ends of the table. I separated the pieces of clamping end of the vice so that you can see the two clamping force bolts and the lockdown bolt on the moving jaw. The lock down bolt removes any tendency for the jaw to lift after tightening to the work piece giving it Kurt type holding results.

The second picture shows long T nuts and track guides. This old Burke mill has only one T track which is why my vice project generated an unique design.

The parts are crudely made but it works much better than expected and it greatly increases the capacity of the mill.

IMG_2323.jpg


IMG_2320.jpg
 
Great ideas here. I've been looking for something just like this. Guess I'll be busy this weekend.
 
Something like this has been on the list for a long time. Thanks for refreshing my memory.

Tom
 
Thank you Bazmak and workshopman for the great ideas. As a result of your posts, I have started making both types of vises for my new mill, as the only vise I have for it is an 8' wide cast iron unit that weighs about 50 pounds! I'm using it to hold the parts to make the new ones, and then will probably only use the big one on rare occasions once I have the light weight ones.
 
I am looking to make a small version for my new rotary table
Time will tell.Keep posts coming,any good idea grows like tree roots
most things have been thought of but its the changes etc that i like
modding mods for new mods if that makes sense
 
Digressing a little, but having mentioned the rotary table bazmak, the best type of vice for this, in my opinion, is one made to the toolmakers vice style. These give much more fredom as to where on the rotary table it is fitted. It can even be placed overlapping the outer diameter enabling it, within reason, to work at a diameter larger than the rotary table itself. For a simple example see photo 17 here

For more details on my preferences for the toolmakers vice see my pages "The Benefits of the Toolmakers Vice style"

Also of possible interest is my gallery of Rotary Table Setups

Harold Hall
 
Thank you for your input Workshopman.I am familiar with the name of Harold Hall as with other model engineers of prodigious output.I browsed thru your site,many thanks.I will keep it as a continuous reference
I will use some of the vice details with a few tweeks i have in mind
Will keep in touch,best regards barry
 
  • Like
Reactions: gus
I have reopened this thread.I use the vice a lot but it has minor niggles due to the way I made it and of course the dreaded jaw lift.Here is my final design
Starting with 2 pieces of 40mm sq bar the full width of the table I cleaned up
and milled 2 male tenons to suit the table.The fixed jaw was a good fit with no play and dead square to the table.The clamping jaw had a few thou of play
to allow the jaw to contour slightly with the job
I reduced the head thickness of M12 bolts to make perfect studs for the T slots
Instead of machining a slot to form a flexible leaf I made a leaf jaw from 3mm plate and fixed with 5 no M3 csk screws along the bottom edge.I reasoned
that the clamping screws would eventually damage/deform the thin leaf jaw
this way its replaceable.I drilled and tapped for 3 no M8 cap screws.The max jaw movement is only 2mm.It works really great.No jaw lift whatsoever and far superior to my first attempt. GUS this can be one of your first projects for your new mill
 
I am using jaw lift as an advantage in my simple mill vice. It may not be visible in the picture but the movable jaw has a T nut holding it down and the jacking section has a T nut as well. I lock the fixed jaw and the jacking section then tighten onto the work piece which causes the movable jaw to lift slightly, The final step is to tighten down the movable jaw which applies greater clamping pressure.

As much as I like this design I only use it for very large pieces when my little 3 inch vice is too small.

IMG_0264.jpg
 
Back
Top