dsquire
Well-Known Member
- Joined
- Mar 18, 2008
- Messages
- 980
- Reaction score
- 15
Brian
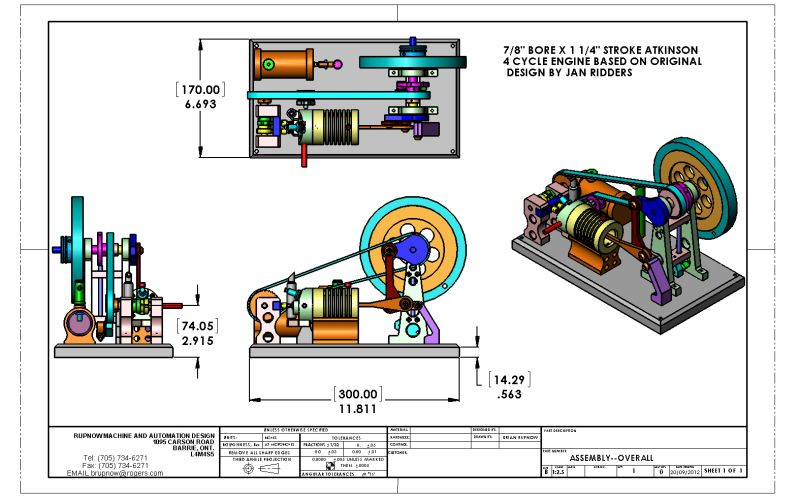
I am going to go out on a limb here and say that Increasing the bore of your engine is not going to solve the problem of why it is not running.
You should already know this. In order to build a fire you need 3 things.
1. Fuel - something to burn
2. Oxygen - you can't have a fire without it
3. Ignition - some means of starting the fire
If your building a campfire its pretty simple, throw a match into a pile of dry leaves and sticks and away it goes. You have all 3 elements.
If your trying to build a fire inside a cylinder head on top of a piston things get a bit more complicated but you still need all 3 elements. As well the fuel and oxygen need to be mixed together and be pressurized to a ratio of about 5 to 1 in order to be ignited by the spark.
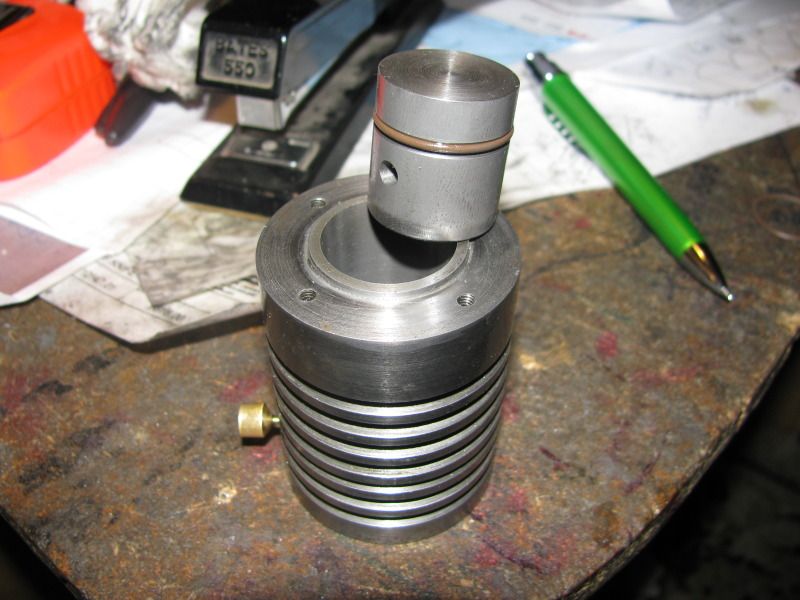
In order to check for a compression ratio hold your finger over the exhaust to plug it off and turn the motor over with a drill. If it doesn't blow your finger off the exhaust then you may not have a high enough compression ratio. Possibly leaky valves and/or piston.
Once we have enough compression lets move on to fuel. I believe that you said before that it would run for short burst then quit. It was probably out of fuel. Even though there was fuel in the tank it was not sucking it up. Let's give it a hand. Find a way to attach a gas line to the exhaust and run it to the fuel tank to pressurize it so that we can force the fuel out. This is something that we did with RC planes so that we would have reliable engines no matter what the orientation of the motor was.
Now if your compression checked out that means there was air coming out the exhaust which meant air was going into the carb onto the top of the piston. Unless the air in Barrie doesn't have any oxygen you have met rule #2 above. You should also be able to see or feel that fuel is coming out of the exhaust. This means you have met rule #1.
Now we deal with Rule #3, igniting the fire. As I recall we want to have a spark a few degrees before TDC (top dead center) on the compression stroke. Take the head off if necessary and verify that the plug is firing at the proper time with a good healthy spark.
When you get #1, 2 and 3 in the proper ratio at the proper time that motor will start to purr like a kitten.
I believe you said that you wanted a longer spark plug as it didn't reach far enough into the head. Would it be possible to counter bore slightly on the plug seat in the head to allow the plug to sit deeper? Might not work, just a thought.
I know that this sounds elementary Brian but the engine isn't running so something isn't right. Check, check and recheck. Don't take anything for granted because if you do it will come back to bite you. I learned all this one day many years ago in the school of hard knocks. It makes an interesting story. I guess I should type it up and post it some day.
Remember, keep your stick on the ice, I'm pulling for you.
Cheers")
Don
I am going to go out on a limb here and say that Increasing the bore of your engine is not going to solve the problem of why it is not running.
You should already know this. In order to build a fire you need 3 things.
1. Fuel - something to burn
2. Oxygen - you can't have a fire without it
3. Ignition - some means of starting the fire
If your building a campfire its pretty simple, throw a match into a pile of dry leaves and sticks and away it goes. You have all 3 elements.
If your trying to build a fire inside a cylinder head on top of a piston things get a bit more complicated but you still need all 3 elements. As well the fuel and oxygen need to be mixed together and be pressurized to a ratio of about 5 to 1 in order to be ignited by the spark.
In order to check for a compression ratio hold your finger over the exhaust to plug it off and turn the motor over with a drill. If it doesn't blow your finger off the exhaust then you may not have a high enough compression ratio. Possibly leaky valves and/or piston.
Once we have enough compression lets move on to fuel. I believe that you said before that it would run for short burst then quit. It was probably out of fuel. Even though there was fuel in the tank it was not sucking it up. Let's give it a hand. Find a way to attach a gas line to the exhaust and run it to the fuel tank to pressurize it so that we can force the fuel out. This is something that we did with RC planes so that we would have reliable engines no matter what the orientation of the motor was.
Now if your compression checked out that means there was air coming out the exhaust which meant air was going into the carb onto the top of the piston. Unless the air in Barrie doesn't have any oxygen you have met rule #2 above. You should also be able to see or feel that fuel is coming out of the exhaust. This means you have met rule #1.
Now we deal with Rule #3, igniting the fire. As I recall we want to have a spark a few degrees before TDC (top dead center) on the compression stroke. Take the head off if necessary and verify that the plug is firing at the proper time with a good healthy spark.
When you get #1, 2 and 3 in the proper ratio at the proper time that motor will start to purr like a kitten.
I believe you said that you wanted a longer spark plug as it didn't reach far enough into the head. Would it be possible to counter bore slightly on the plug seat in the head to allow the plug to sit deeper? Might not work, just a thought.
I know that this sounds elementary Brian but the engine isn't running so something isn't right. Check, check and recheck. Don't take anything for granted because if you do it will come back to bite you. I learned all this one day many years ago in the school of hard knocks. It makes an interesting story. I guess I should type it up and post it some day.
Remember, keep your stick on the ice, I'm pulling for you.
Cheers
Don