More "New" Lathes at Work

Home Model Engine Machinist Forum

Help Support Home Model Engine Machinist Forum:

This site may earn a commission from merchant affiliate links, including eBay, Amazon, and others.

rake60

Well-Known Member
Joined
Jul 8, 2007
Messages
4,756
Reaction score
124
Not hobby shop related, but some may find it interesting.

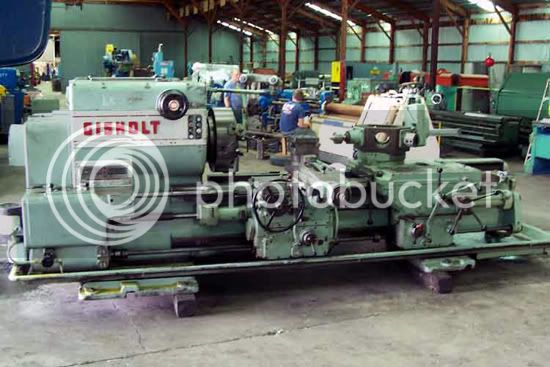
At work, I'm setting up a new secondary machining department for a powdered metals
manufacturing company. We had bought two old 1970's era Hardinge DSM-A Automatic
turret lathes to start with. They are surprisingly effective for the applications at hand.

A few weeks ago, we learned of a place that had two more of them in storage that might
be for sale. Then I found out that they had been in an unheated storage unit for five years.
On the trip to look at them, I warned the guy who was with me that they were probably
going to look like lumps of rust, but that wouldn't mean they were junk.

They looked pretty much as I had expected them to.

DSMAAsFound.jpg


DSMATurretAsFound.jpg


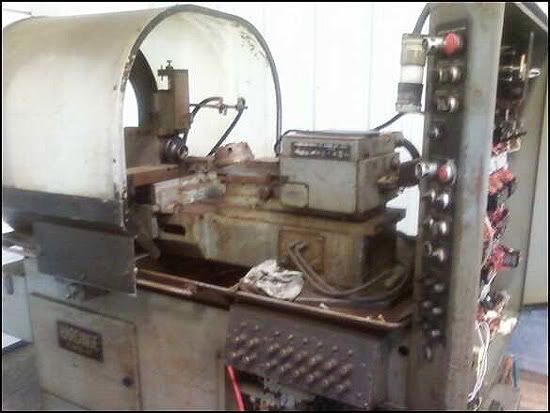
In just three days, we have one of them ready to make parts.
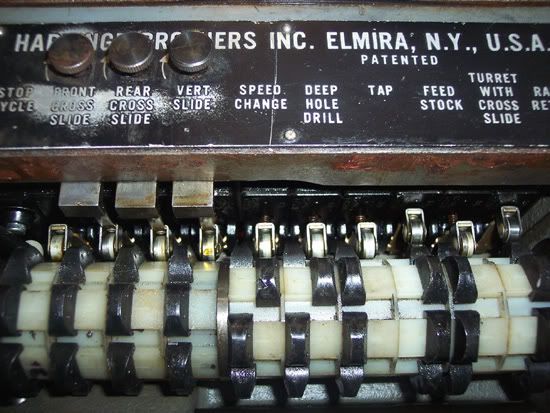
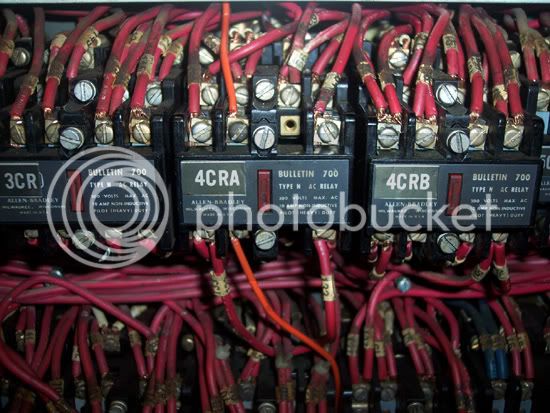
The first two days were spent trouble shooting the electronics. These machines had been
"MacGyver'ed" quite a bit. The third day was just plain old cleaning up.

DSMATurretCleanedUp.jpg


DSMACleanedUp.jpg


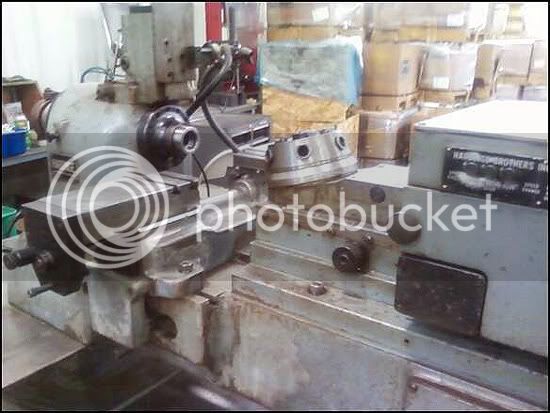
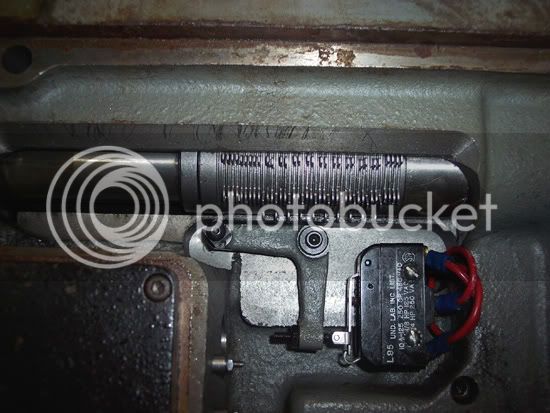
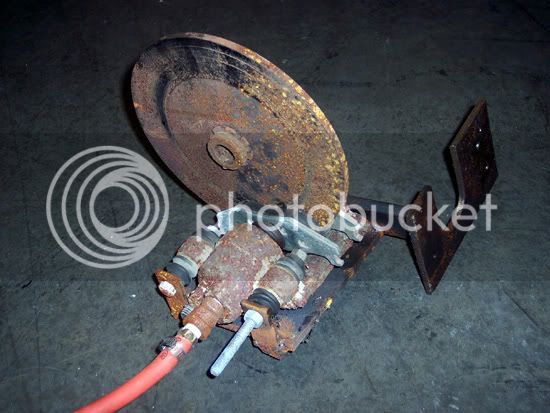
It looks decent and cycles perfectly for all operations except the vertical slide. The solid
state timer is bad in that circuit. Replacing that timer would cost what we paid for the machine.
Since the vertical slide is intended for a cutoff tool that we do not need for secondary machining,
we'll leave it alone.

Now onto the second lathe from that purchase. We'll see what we got for our money there.

Rick

 
Progress on Old Lathe #2 today.

The collet closer was missing on this machine, but I had told the owners that I had
enough spare parts there to make one up for it.
The collet closer is basically a simple double acting air cylinder.

Everything was going good until I found out my spare collet closer cylinder rod was broken.

BrokenCylinderRod.jpg


The threaded end that is broken off the rod is supposed to thread into the backing plate
that holds the forward and reverse pressure seals in place.
There are no replacement parts available for these old machines so I had to come up with
a way of fixing what I have.

I chucked the rod up in a three jaw, faced the broken end flat back to it's original shoulder,
then drilled and tapped it for a 1/4"-20 socket head screw.
Then I stuck the backing plate in the lathe and used a 3/8" end mill to cut a counterbore
just deep enough to set the top of the screw flush with the back side of the plate.

CylinderRodRepair.jpg


It went back together fine and seems to be working properly.
It may not have been the best solution, but it was the best I could come up with at the time.

This lathe still has a ways to go, but it's coming along...

Rick

 
The first one looks like it turned out to be a winner, Rick. The shot after clean up makes it appear as
if it has been sitting in a machine shop and cared for the whole time.
I'll bet some of us here would enjoy a video of it going through a work cycle when you get the chance.
Good old machines.
 
I had posted a video of the original two machines doing their job here before.

Here is is again:

[ame]http://www.youtube.com/watch?v=GoJrpbrgqaE[/ame]

Rick
 
It's great to see these old Hardinge machines live again. I've never understood how and why fine tools are simply stored badly with no protective oil on the metal. At a minimum, 15 minutes with a grease bucket and a stiff brush, and it'd be reasonably protected.

Caveat - just not that nasty RED grease that so many Chinese machines seem to be shipped with these days! ;D I wonder if "Cosmoline" is still available. IIRC, it was a lanolin compound that you'd first heat up to melt, then dip or brush. A layer of gauze on the ways first dipped in melted cosmoline would work.
 
Most of the shops I have worked for used Cosmoline Spray.
It's still AVAILABLE.
Any decent parts cleaner solvent will dissolve it for removal.

The company we bought these past two lathes from certainly didn't use it.
They didn't even clean the chips out of the t-slots before placing the machines in
storage for five years. Getting them running again isn't so bad compared to the clean
up work involved.

Rick
 
I finally got the fourth lathe fully operational today.
There was a short somewhere in the circuit that controls the turret forward motion.
The turret would move forward but it would not retract and I simply could not find the short.

I split the control circuit from the wiring that actually sends the 120 volt control to
the hydraulic valve that moves the turret forward.
Then, I added a normally open contactor to a vacant space in one of the relays that is
supposed to control that motion.
The top of the contactor was connected to a constant 120 volt hot wire and the bottom was
wired to the hot side of the hydraulic valve.

The control circuit still "tells" the relay when to close and open, but my new contactor
wiring makes it do what is supposed to do.

Pity the next person who has to work on this machine.
The wiring has been "McGyver'ed" even more now.

Wiring schematic?
Those are just for reference!

:hDe:

It is kind of cool to hear it running.
I don't know what the company who had it was machining but the spindle speed is running at
1700RPM smooth as melted butter.

I'll try to get a short video of it cycling tomorrow.

Rick
 
rake60 said:
I'll try to get a short video of it cycling tomorrow.

Rick
Thanks for the first video, Rick. If you can get a new vid of this latest lathe doing its thing, I'll watch that one too!
Glad you have them all up an running.
 
This is the relay I added the contactor to.
The two inner spaces were vacant, so I used the second position for my addition.

AddedContactor.jpg


No red wire in the box so orange would have to do.

This video shows the machine cycling the turret, front and rear cross slides before the machine
was cleaned up.

[ame]http://www.youtube.com/watch?v=q5LUSYaPxGI[/ame]

A video of the turret forward relays doing their jobs. Both the 4CRA and 4CRB relays are involved
in that operation. It was the 4CRA that has the open contactor slot that I took advantage of.

[ame]http://www.youtube.com/watch?v=nTe-CjspduQ[/ame]

After several hours of cleaning the machine up I took one more video of it in operation.
We never use the vertical slide in any of your machining processes, but I programmed it just to
see how it would work.

[ame]http://www.youtube.com/watch?v=yIpY5qBK8o8[/ame]

I did have to remove one of the previous owner's additions.

After a half hour of continuous dry cycling, something was smelling hot.
They had replaced the broken electrical spindle brake with a homemade brake.

SpindleBrake.jpg


That is an automotive brake caliper and a disk that had been machined to fit the spindles clutch
shaft. It was actuated by a solenoid controlled pneumatic valve.
We don't need that dragging all of the time, so I removed it.

Rick
 
rake60 said:
That is an automotive brake caliper and a disk that had been machined to fit the spindles clutch
shaft. It was actuated by a solenoid controlled pneumatic valve.
We don't need that dragging all of the time, so I removed it.

Rick
Gotta give them points for ingenuity, but they were a little brain dead thinking air powering something out of cast iron designed for hydraulics wouldn't rust solid. Stick that piston in the press and find out how many tons of force it takes to move now. :)
 
Lakc said:
Gotta give them points for ingenuity, but they were a little brain dead thinking air powering something out of cast iron designed for hydraulics wouldn't rust solid. Stick that piston in the press and find out how many tons of force it takes to move now. :)

That brake would would take that spindle from 1700 RPM to a dead stop INSTANTLY after 5 years in cold storage.
They must have had one heck of a in line oiler on their air supply.

Rick
 
Oil would react with those type of seals, but ill buy a hell of a dryer system to keep the moisture out. Or maybe they did swell up huge?
 
On a disk brake calliper, The gap between the pad and disk is maintained just by the flex of the seal. With so little movement to activate, you can keep the cylinder full of oil and still actuate it with air. All you need is to keep the air supply line high so that it doesn't syphon the oil out.

With longer travel, a little reservoir can be added between the supply and cylinder to store a little amount of oil for the full travel. I've seen this system applied to an auto car wash roller brush arm on a double acting cylinder where they mounted 2 reservoirs of about 3 litres each on both sides of the cylinder. The air presses on the oil surface and the work is done by the oil achieving a smooth movement.
 
I have recieved a few PM's about these turret lathes.
They bring back memories.

(Oh S#!t, NOT another machining story!)

Before I was actually a machinist, I worked as a production machine operator in a Mom & Pop screw
factory. We weren't making SCREWS but threaded parts. Mainly ferrules to adapt different size natural
gas pipes to Rockwell gas meters that were being manufactured at a Rockwell plant about 15 miles away
from the screw factory I was working at.

All of the turret lathes had pneumatic chucks in them with a constant, heavy stream of cutting oil flowing over them.
You never stopped the spindle. You would stick a part into the pneumatic chuck while it was spinning then flip the
air valve to close the chuck. The oil would help it to spin free from your grasp.
*bang*

The set up man would set all of the tooling in the turret and cross slides.
All I did was crank the handles and check the results with Go/No Go gages every 50 pieces.
If anything was out of whack you would have to go get the set up man to come and fix it.

At the age of 18, I thought I was a machinist! ::)

Fast forward 30 years:
By this time I AM a machinist operating CNC machines in a job shop.
The CNC machines overload easily and the parts we are making from forged slugs need to have an approximately 5 inch
bore machined in them.

To save the beating on the CNC's we would set those forgings up in a tired old Gisholt turret lathe identical to this one.

GisholtTurretLathe.jpg


It had earned it's keep many years ago and was TIRED! It was affectionately known as the "Gut Shot".

The indexable cross slide had a facing tool in one holder and a turning tool in another position.
The turret had a spotting drill in one station and a 4-1/2" speed bit in one station.

After you had a part running in your CNC machine, you would chuck up and roughly indicate in one of the forgings.
The facing tool would be used to true up a face to rest against the chuck in the CNC macnhine.
The turning tool would be taken in to minimum clean up on the OD just as far as the CNC's chuck jaws would be deep
so the drilled hole would be concentric when the CNC's hydraulic chuck closed up on it.

After the face and OD were cleaned up, the turret was brought into action.
Spot drill first then slow the spindle down and begin the speed bit drilling process.
That would take some time.

I was lucky enough to have my CNC machine directly across the walkway from the "Gut Shot"
I could hear that bit starting to crackle as it was about to break through after drilling it's 8" deep hole.

Even in the CNC world, the old manual turret lathes still have their place!

Rick

 
This fourth Hardinge DSM-A automatic turret lathe turned out to be the most capable.
I even managed to get the deep hole drill and tapping cycles to work in it.

Programing involves sliding cam blocks to trip micro switches in the programing unit.
As this photo shows, the Deep Hole Drill and Speed Change cams have been moved to the right.

ProgramingUnitforDeepDrill.jpg


On the back side of the machine there is another micro switch set up that sets the pecking depths.

DeepDrillPeckingProgrammer.jpg


Each of those mechanical tabs are 1/16" thick. As I have them set, it will peck 1/4" at a time.
So here we go. First from the turret view.

[ame]http://www.youtube.com/watch?v=LbLE1P-t1_Y[/ame]

Then from the pecking programmer side.

[ame]http://www.youtube.com/watch?v=5hH9ctcLmxo[/ame]

There is another cam block on a barrel below the main programming unit.
It sets how far forward the turret will rapid before it goes into feed.
When the deep hole drill is programmed, it also sets how far back the turret travels when pecking.

[ame]http://www.youtube.com/watch?v=KT9jEWoMRIE[/ame]

To put it all together, I programed an all tools cycle run.
There is still no tooling in it, but this is how it would run.

First move would feed the stock in.
Second move would be a spot drill.
Third move, deep drill cycle.
Fourth is a tapping cycle where the spindle will reverse to allow the tap to retreat.
Fifth move brings in both the front and rear cross slide.
Last move activates the vertical slide for a cutoff.
Then it is supposed to shut it's self down for another stock load.


[ame]http://www.youtube.com/watch?v=HD1oMcwNd38[/ame]

Ancient technology that was brand new the year I graduated from high school. ::)

We even have some home brewed equipment modifications.
We make parts that require nothing more than a hole being tapped in our secondary machining department.
An air cylinder and valve turned that into a semi-automatic process.

[ame]http://www.youtube.com/watch?v=uo-fuG91LG0[/ame]

It isn't pretty, but it beats pulling the drill press handle for every piece.
Saves a lot of wear and tear on the operators shoulder and elbow.

Rick


Once again, thanks for all the vids, Rick. I never worked in a shop that had anything more automatic than plain old Bridgy or machine lathe. One place I worked I got a lathe with a tailstock turret. That sure sped up the short runs, but it also meant I got the repetitive jobs. I enjoyed it all though, from my very first turn of a dial.
 
Love the tapping machine, it doesn't have to be CNC to make money. I spent a couple of years working with cam driven single spindle bar autos machining brass, they where fun to get going.
 
Deanofid said:
Once again, thanks for all the vids, Rick. I never worked in a shop that had anything more automatic than plain old Bridgy or machine lathe. One place I worked I got a lathe with a tailstock turret. That sure sped up the short runs, but it also meant I got the repetitive jobs. I enjoyed it all though, from my very first turn of a dial.

Yes, thanks Rick :bow:

I have never worked in a production environment. Of the more than 100 machine tools we had in our workshop the only ONE that came close was an old Herbert Turret or maybe Capstan lathe, can't remember which. I dddooo remember each of us having a play setting it up. It was pure handraulic ;D The turret/capstan was move back and forth by hand which indexed the tool post and there were all sorts of little levers poking out from various places which acted as the limit switches or , if you like, stops. I do remember, (after the initial set up and winding things back and forth a few times), thinking thank god I don't do this for a living. :eek:

More power to you guys who do. :bow:

Best Regards
Bob
 
Back
Top