Steam Tractor

Home Model Engine Machinist Forum

Help Support Home Model Engine Machinist Forum:

This site may earn a commission from merchant affiliate links, including eBay, Amazon, and others.

Harold Lee

Well-Known Member
Joined
Apr 23, 2008
Messages
236
Reaction score
2
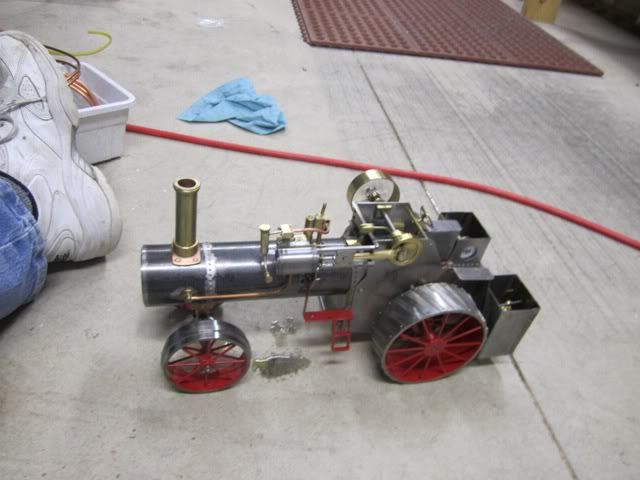
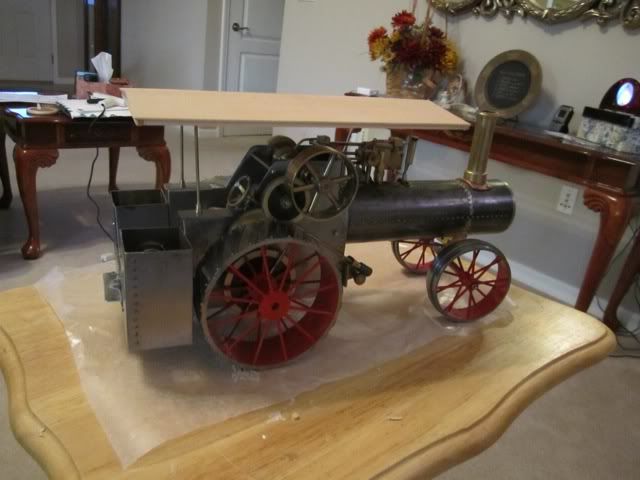
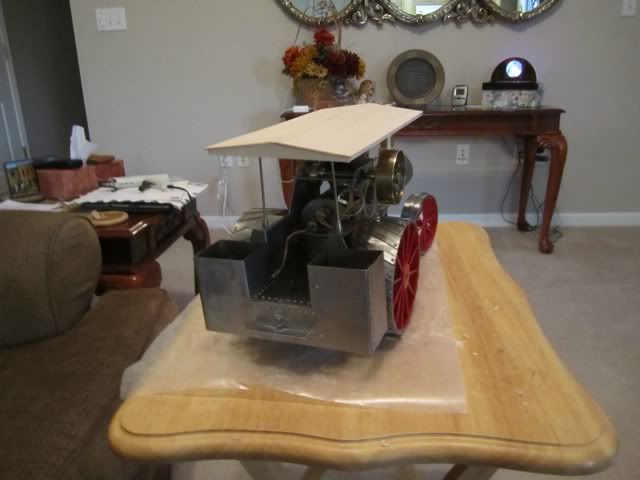
I don't know if this post belongs here since I am about 90% complete with my Steam Tractor build. About 5 years ago I started building a steam tractor from Rudy Kohoupt's plans featured in Popular Mechanics Magazine in the 70s. The plans which were $10 and were ordered from the publisher, consisted of 16 C size drawings and a few pages of narration. I started mine on the encouragement of a friend that had built one and my had run it for my grandson. As all projects go, There were many higher priority projects, other engines to build and the tractor sat collecting dust on a shelf in the back of the shop. When Dennis started his build a couple of years ago, I was inspired to move it from the back of the shop to a shelf in my office... Still collecting dust. I followed Dennis' build and was amazed at his craftsmanship and creativity.
Both of my adult kids ( 34 and 37) and my Grandkids kept saying "When are you going to finish your tractor?". When Jerry resurrected his Steam Donkey, I realized that it was time to move it to the front burner. SO..... With about 40-80 hours of work left to complete it, I am showing it here and will post my progress.

My list of items to be completed:
Steam Dome, Intake Steam Supply, Throttle Quadrant, Steering chains and system, Condensate drains, boiler front (inspired by Dennis' build) and paint. And the one thing I am committed to doing that I have yet to see on any of the models. I am going to make a canopy cover.

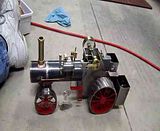
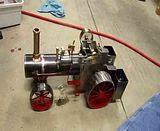
Today I got all of the plumbing put together and did the first steam up. There are no gaskets and the pop off valve is set too low and leaks so I could only get about 10 pounds of steam and a lot of water. The oiler leaked all of the oil out ( see puddle in pictures) but it ran under its own power.

file.jpg


Here are a couple of short videos of it running in "neutral"


Good looking so far. I have one of these on the back burner so will be looking forward to your posts. Nice job on you have done.
 
Say Harold, that is awesome to see another one of those models come to life, puddles and all. This model engine has always held a certain fascination for many (myself included). I have some of the basics completed for one (rear wheels, cylinder, and most of the front end pieces) but it got shelved due to life's other more pressing needs. Please don't start me towards getting it back out as I really am not in a good position right now to do so ;D :'( Post up your work as you go forward, we would all enjoy the remainder of the ride.

BC1
Jim
 
Harold, that is amazing. Can hardly wait to see it finished.

"Billy G"

 
Its Amazing now
imagine what it will be like when its done :bow:
love it
Pete
 
It looks great Harold...I am glad you were persuaded to resurrect it. Looking forward to seeing the remainder of the build and I like the idea of the canopy too!!

Regards,
Bill
 
Thanks to all for your encouragement and kind words. Today was one of those days that I think I had a stomach bug so I did not venture in the shop. However I decided to sit in front of the TV, and while I was feeling sorry for myself, I would make some progress. Since I promised a canopy I figured that could be built on a TV tray. I have to say I cut myself a couple of times on the Xacto knife but I did manage to get it put together. I still need to paint it and to put in the sockets for the three posts but here it is.

file-5.jpg


file-4.jpg


file-3.jpg


The resolution of the pictures do not show the roof detail but it is a model "shiplap' type of design. I hope it will show up in the following photo. I also made the underside like a built up roof ( see above photo) to give it some dimension.

file-6.jpg


The weather forecaster is predicting a couple of inches of snow tomorrow so it might be a few days before it gets the finish put on.
 
Love the Traction Engines, especially Rudy's.

I'm following along too, Harold. The canopy looks great...

Jeff
 
I does look good! Hope your feeling better Harold!

Dave

 
When I lived in Alaska we had a saying.... "Sometimes you eat the bear, and sometimes the bear eats you". :'( Today was one of those "bear eats me" days. I have vacillated on whether to post my problems but my purpose is not to just blubber about it, I know some of you will be able to help.

If you have followed my posts, Friday was my first live "steam up" day for my engine. I actually made the cylinder and steam chest about 4 years ago and at the time I made them out of cast iron. My reasoning is most steam engines are made from cast iron and with a bronze piston and slide valve It should work just like the big guys.

When I fired it up today, the first thing out of the exhaust stack was rusty condensate. My thinking is on an engine that runs daily, there is enough oil and temperature to keep the cylinder from rusting. On my model that will run once or twice a year, I think cast iron is the kiss of death. When I took the cylinder apart, the valve face was rusted and pitted. I do not think this was from my run last Friday; rather it was from accumulated moisture from three or four years ago when I was setting the engine timing and run in on compressed air. I do not have a moisture separator on my compressor and I assume the moist air started the rust and did the pitting. The run on Friday just loosened up the rust that had been working for a few years.

Here are my choices as I see them.

A. Put it back together and make it a static display.
B. Remake the cylinder out of bronze.
C. Get some information from you that will help me solve this issue.

I do not like option A since I wanted to make an operational tractor and while I do not plan on running it very often, I would like to have that option.

If I remake the cylinder out of brass or bronze, what material do I make the piston and slide valve from to keep them from galling. As I understand it, cast iron is the only material that can be run together without galling. I am thinking I need two dissimilar materials that will not rust or gall that I use for the parts. ???

Any help or advice would be appreciated...

Thanks,

Harold
 
Hi Harold.Can you solder a false face on the port face and rebore the ports?
Bill
 
I have always loved traction engines. My best friend built the Case from Rudy's plans and it came out beautifully. It has been my desire to also build it. I have all the materials. When my friend collected all the materials there was much left over. He has given me access to it. Now all I have to do is get off my lazy duff and go to work. Oh well, at my age . . . .

Your work looks great. I am impressed!
 
If I remake the cylinder out of brass or bronze, what material do I make the piston and slide valve from to keep them from galling

Hi Harold,
FWIW, I agonized quite a while over what to make the cylinder and piston from. Finally I just made them both out of brass. It's been over a year and a half now and with infrequent steam ups, I haven't had any problems. I think the residual steam oil takes care of any galling issues.
Dennis

P.S. Very nice job on your tractor.
 
Good going Harold Thm:

Like Dennis said - brass/bronze as a combination works; both my live steam locomotives runs brass on brass for the pistons and don't seem to care too much about it.
You could also opt for a brass/bronze and stainless steel combination; that gives a combination with two dissimilar metals reducing the risk of galling, and no rust.

Kind regards, Arnold
 
...Isn't it odd that a good looking steam tractor does NOT look out of place on a sitting-room coffee table?
 
WE HAVE A RUNNER!!!!! WOO HOO!!!

I spent the last two days fiddling with the engine and here is what I have decided for the time being. I am going to keep the cast iron cylinder and if/when it needs repair, I'll replace it with a brass or bronze. Here is my plan. After running it I am going to connect compressed air to the fill valve and run it for several minutes to dry it out. Then I am going to unscrew the displacement lubricator and put some alcohol in it as this will absorb water. After that I'll put a few drops of light machine oil in it and hope that takes care of the water problem. When I did my tour in Thule Greenland (actually Camp Tuto) we would add a cup of alcohol to the gas to absorb the water. I hope this works. If some of you with experience want to comment and offer advice, please do.

That being said, I got it back together and tuned up and I have to say it far exceeded my expectations. I did not know if the burner could keep up with the steam demand. It did!!! If you look near the end of the video when I throttled it back you can see the pop off valve venting steam. The only problem I found is the throttle is a bit touchy and took a bit of fiddling to get it to slow down. If you look at Dennis' build you will see that he deviated from the original gearing to slow the tractor down a bit. Since I made all of my gears, I followed his setup and am really glad I did.

The boiler holds 5 ounces of water and the burner holds 3 ounces of alcohol. It takes about 12 minutes to build up a head of steam and about 15 seconds to get the condensate out. I found I had to be careful since the first few slugs of water come out the blastpipe and the stack and can give a shower....

I am going to post three videos. The first link will be of it running. The second and third, are not as interesting but for those of you would like more detail, they will show the filling of the boiler, the tank and the warm up. The second one will show the steam up. Since I do not have the condensate drains made yet you will notice that the engine will get hydraulic lock the first few turns, followed by the smoke stack water shower as it shoots it out of the blast pipe and then it roars to life.

[ame]http://www.youtube.com/watch?v=-SsD5HIFN8Q[/ame]

The following two videos are showing the tank fill and steam up. I included for instructional purposes but they are more like watching paint peel in their entertainment value.

[ame]http://www.youtube.com/watch?v=ndrZdqBKkmY[/ame]

[ame]http://www.youtube.com/watch?v=XUzjJqncxJo[/ame]

I am going to run it a few more times for the grandkids and then take it apart for paint and finish. After I'm done I'll rerun it and post a final video.

My current plans are to continue to post some of the work I do as well as the progress pictures on the final fiddly items.


That's awesome Harold! Looking foward to the fiddly bits.... ;D

Dave
 
WOW, :) :) :) very nice Harold.

Enjoyed both videos.

Congrats to your success and I look forward to the rest of the project.

Jeff
 
th_wav That is beautiful, great job. I could watch it run back and forth all day.
thank you for the videos.

tom
 

Latest posts

Back
Top