17,5 ccm 4 stroke single cylinder engine

Home Model Engine Machinist Forum

Help Support Home Model Engine Machinist Forum:

This site may earn a commission from merchant affiliate links, including eBay, Amazon, and others.

stef110

Member
Joined
Jun 7, 2015
Messages
21
Reaction score
26
Hello engine builders,

A few years ago i made the 2 stroke debbie engine from Jan Ridder but never get it to work.
This project: https://www.homemodelenginemachinist.com/threads/2-stroke-debbie.24576/

This weekend i started a new project. Im going to try to build a 4 stoke engine. I just bought building plans from http://www.cad-modelltechnik-jung.de Its a well documented build plan.
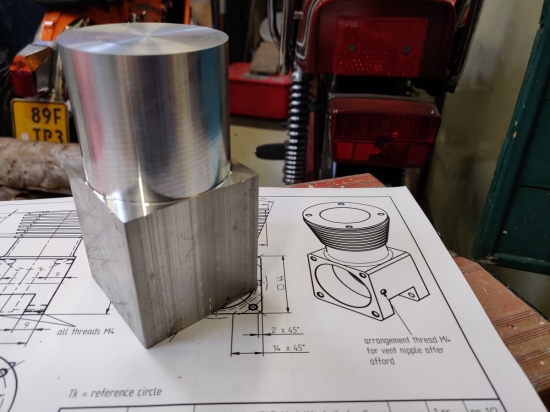
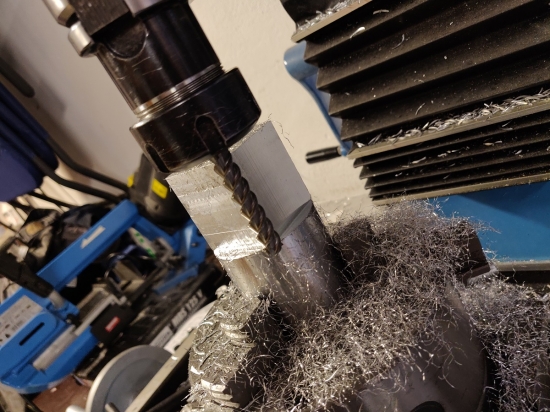
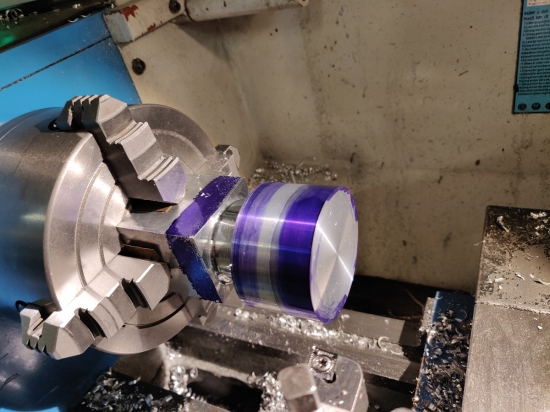
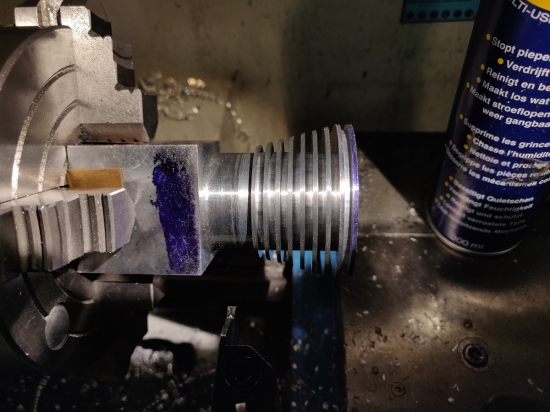
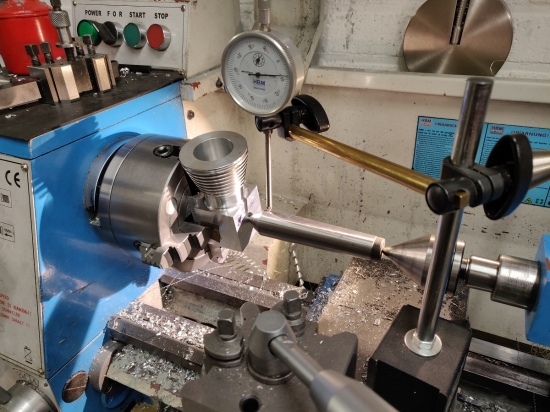
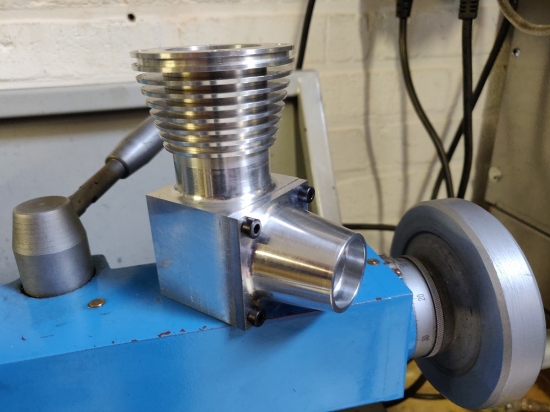
This weekend I machined the main body here are some pictures of it:

thumb.php


thumb.php


thumb.php


thumb.php


thumb.php


thumb.php


stef
 
Tnx im enjoying the build so far.

I have a small question about the cylinder and piston. In the building plan they talk about a ductile graphite iron cylinder liner.
And as a piston ring they recommend a st60 material.
As a left over from my Debbie build i have a piece of GG25 cast iron left can i also use this for the cylinder liner?

stef
 
This weekend i started on the cylinder head on the lathe. Today i did some cnc milling on it. onlything left to do is drill the hole for the glowplug. but it needs to be under an angle and there for i first need to buy some new tools.

thumb.php


thumb.php


thumb.php


thumb.php


stef
 
Today i machined the back plate of the motor, and made the cylinder liner out of cast iron (gg25).
My question till stays what material for the piston ring? can i also use the same cast iron for this?

thumb.php


thumb.php


thumb.php


thumb.php


stef
 
Hi Stef,
I think you'd better use a harder quality cast iron for the piston ring, for instance GGG 40 or 60. In general it is not a good idea to have identical materials of the same hardness running against each other.

Jos
 
I've just made a start on this engine, really good to see the progress you're making, looks superb. How did you turn the radius on the valve stem? I'm planning on using a steel liner and ductile iron ring, but far away from making those bits yet.
 
I will find an harder cast iron for the piston ring then.
This evening i finished my second valve, also the valve springs came in today.
The radius on the valve is done with a round lathe tool insert (don't know the exact English word for the tool)
Planing on making the piston this weekend.

stef
 
Today i machined the back plate of the motor, and made the cylinder liner out of cast iron (gg25).
My question till stays what material for the piston ring? can i also use the same cast iron for this?

I always do without any problems.
Naturally the ring is heat treated in between a pair of specifically made relatively large steel blocks with wedges in the ring ends and then allowed to cool.
Ring is then fitted to a mandrel for final turning to true the now slightly out of shape ring and to bring to final size.
Plenty of info out there on how to do it.
 
Tnx bluejets for the info.

Today did a lot of progress, valves are done including the springs underneath them and it seems to fit and seal well. Also made the crankshaft and the bearing blocks to support the crankshaft.

stef

550-OAR:%20cache[DIR]albums[DIR]modelbouw[DIR]17cc_4_stroke[DIR]IMG_20190209_125816.jpg


550-OAR:%20cache[DIR]albums[DIR]modelbouw[DIR]17cc_4_stroke[DIR]IMG_20190209_125822.jpg


550-OAR:%20cache[DIR]albums[DIR]modelbouw[DIR]17cc_4_stroke[DIR]IMG_20190209_162700.jpg


550-OAR:%20cache[DIR]albums[DIR]modelbouw[DIR]17cc_4_stroke[DIR]IMG_20190209_184736.jpg


550-OAR:%20cache[DIR]albums[DIR]modelbouw[DIR]17cc_4_stroke[DIR]IMG_20190209_192753.jpg


550-OAR:%20cache[DIR]albums[DIR]modelbouw[DIR]17cc_4_stroke[DIR]IMG_20190209_202039.jpg


550-OAR:%20cache[DIR]albums[DIR]modelbouw[DIR]17cc_4_stroke[DIR]IMG_20190209_211025.jpg
 
Difficult to see exact detail on the valve caps but I tend to recess the circlip slightly into the cap.
Makes sure it stays put. :)
Nice work.
Perhaps just a little commentary on materials used etc...??
 
@bluejets
It was a quick post so let me explain a little now.
What you said about the circlip its true i re watched the drawing and there is a little chamber to lock the clip into will make them so make sure it stays on thanks for the notice.
The camshaft i made from stainless steel it was the hardest material i had laying around. I first did the shafts on the lathe and then milled the cams on it with my 4th axis cnc.
Today i ordered a carb and some glowplugs with a matching tap to cut the threads.
So far iam really enjoying the build!

Stef
 
@jos i send you a PM

This weekend founded some time to machine the crankshaft. Took longer then i thought. Machining the shaft where the piston connection rod is going on took a while. My lathe wasn't happy with the out balanced piece of material. Im really happy with the finished part. Next part on my list will be the Crank stump witch will drive the belt to the camshaft.

Normally there should be a propeller on the front. I would like to make a nice shiny brass flywheel instead. Is there someone how can give me some advice about dimensions of the flywheel?

thumb.php


thumb.php


thumb.php


thumb.php


thumb.php


thumb.php


stef
 
@bluejets

The camshaft i made from stainless steel it was the hardest material i had laying around. I first did the shafts on the lathe and then milled the cams on it with my 4th axis cnc.
Today i ordered a carb and some glowplugs with a matching tap to cut the threads.
So far iam really enjoying the build!

Stef

Be aware that 4 stroke glow plugs are different from 2 stroke ( and usually a lot more expensive).
Idle on glow is always iffy unless using around 10% nitro in the fuel mix, OR , as I found with the older OS60's in aircraft, run one nicad or Nimh cell on the plug say from 1/4 revs down to idle ( just use a micro switch)and forget the nitro.
On the 25cc four cylinder I built for the Rivierra boat, I ran nitro as a test and didn't clean the engine out afterwards. A few days later when I stripped the engine for general checking, found more rust than you could poke a stick at. Haven't used nitro since.
For my cams, I build from silver steel just one pair, and harden. They are assemble on a mild steel small diameter shaft and are pinned with a small roll pin. Obviously the cam is drilled to accept the pin before hardening as the group are mounted on the shaft for grinding( have a purpose built cam grinder).
Hope this helps for alternatives.
Again, like your work.

Edit: if you have deep pockets, there are now also glow plugs available (OS) that will allow petrol running.
 
My intention is to first try to let the engine run on a glowplug (i have bought the OS 4 stroke glow plug's)
If it works then i want to try let it run on a spark plug.

Made the crank stump this week and machined the pullys for the belt to size. I forgot to make pictures of these jobs. Today it was finally time to drill the hole for the glow plug i was really looking up to this because i needed to drill the hole under an angle which i didn't really do a lot before. It seems i wasn't worried for nothing because i screwed up big time. I first drilled a hole from the inside to the outside so i know the hole in the chamber will be on the good spot. Then i had to mill a bigger hole to fit the glowplug in back to the inside.
This hole was a bit miss aligned witch coughed me to drill tough the intake channel... :(
Luckily i managed to fix it by making the carb adapter a bit longer and use some glue to seal it again.

It now really start to look like an real engine. The outside is everything done the only parts left to make are the piston, piston connection arm. and the piston ring. Thanks to Jos i soon gone have some material for the piston ring.

thumb.php


thumb.php


thumb.php


thumb.php


thumb.php


thumb.php


thumb.php


Stef
 
Back
Top