Windows shopping for 3-D printer.

Home Model Engine Machinist Forum

Help Support Home Model Engine Machinist Forum:

This site may earn a commission from merchant affiliate links, including eBay, Amazon, and others.
well I did it now. hope it was a good choice. I wanted to stay under $500 and I have so far anyway. Have been watching e-bay this weekend.

I was watching a used davinci and an eventorbot kit. And I bid on a used solid doodle 4gen now I am hoping it works and is packaged well. will find out in a few days.

Guess I need to buy some filament.
Dave what do you suggest I start out with?
Tin

MYsdgen4.jpg
 
Great to see you did it. Keep us posted with how you tweak your new baby and show off some samples.
 
Hope everything works out the photo posted is the one posted on e-bay so have not had a chance to touch test etc.
the seller states it appears to be new condition other than thee tear in the kaplon tape. So a new chapter in the life of tin falcons nest.
Tin
 
software downloaded. And I have been browsing the help section of thSD web site.

Tin
 
Well guys this thread has been a blast. thanks to all who have contributed.
I have learned a lot in my research.
and I know this is the beginning of the adventure not the end.

I think I will be happy with the solid doodle The one downside I see is the board is one piece not plug in drivers. the advantage of the plug in drivers is you blow one you spend 5-10 usd to pop in a new one but they seem to be a Little sensitive , I expect the SD driver card to be more robust.

Soliddoodle seems to offer a good amount of tech info videos and help screens. the official stance is it cant be upgraded to a dual extruder. sounds like a challenge. but for now I just want to learn how to print with it.


for anyone wanting to build an eventerobot there is a guy selling kits on e bay the one last sunday went for the minimum bid of $450 plus IIRC about $60 to shio. almost everything to build a printer power supply not included so add another $30 to 50 on the build. e-bay seller eventorbot.
there is a guy tadd sale in Florida that is selling dent and bent Davinci's they have been selling for $150 to $300 .


I hope others have learned from this thread.


So am I ending this thread? likely not still more to learn and new things all the time.

I may start a new thread when the printer arrives.
Tin
 
OK now it is is morning and i am almost awake I am asking myself and others Should I be starting with ABS.
the manufacturer states ABS recommended pla possible.
I know abs and some other materials can be vapor polished and chemically welded. Hope I am not trying to run before I walk here.

I think part of the problem is the hardware folks are by nature forced to concentrate on hardware tweaks /improvements.and the material guys are always looking for a better material or bled. So the printer manufacturer often does not really know materials.
the plastics developers can test only so many print heads and the printers r& d can only test so many materials.
Tin
 
I have the solidoodle4. I have used it a bit and find the only real problem is keeping the work stuck to the bed. I find PLA sticks better than ABS. I added a glass plate on top of my bed, and I have tried hair spray on the glass. About half of my ABS prints curl up on an edge, which ruins them. The larger the object the more likely to curl.
 
For those who have been following and are considering building their own, I found another open source build platform similar to Makerslide mentioned earlier. It is called Open Build V slot.
See http://openbuildspartstore.com/

This is also available in Australia http://openlab.com.au/

If you join the openbuild forum, you can download CAD models (including Solidworks) for every component.

It is a bit cheaper down under than Makerslide and a wider range of components is available plus heaps of videos on youtube.

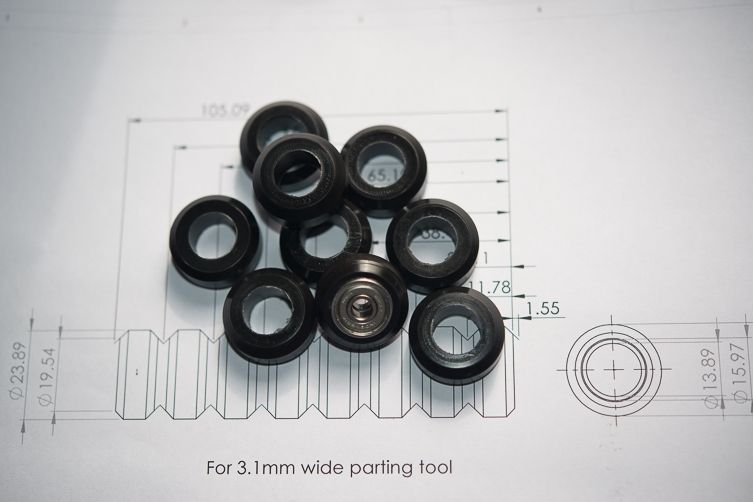
I had to go to my plastic supplier today so I could not resist picking up a metre of 25mm dia Acetal (Delrin) rod and deviated past my bearing shop on the way home. The plastic cost $10 and is enough for 60 or so wheels. The bearings were $5 each because the only ones they had in stock were SKF brand. With a bit more searching, I am sure I can get them for $1 a piece. I've got some hex brass that will do for the eccentric wheel spacers.

Anyway, I thought I would have a go at making some wheels based on their plans. I figure I have to plan out the job so I turn up a set of 4 or 8 at a time so they are all identical dimensions which I can use as a matched set on a given axis. I thought I would turn all the v shaped surfaces first, cut the first bore, part each one off and finish off the bore on the reverse side.

I also finally got around to firing up a Nema 23 on my Arduino via a Gecko 10 x micro stepper and it leaves the little polou driver for dead! I am not sure If I will get any more, but I thought I would use the bigger stepper and the Gecko on the Z axis as there is more weight to move.

I still have no idea what a DIY home made printer will look like yet, but it would be cool to say you machined every part! Hopefully it will have a build volume of 12" x 12" x 12"

I think I will blame Tin and this thread for the $20 I wasted today...
 
Rod, I have ordered cheap bearings off eBay in the past, they were only small ones, but around 60cents each.

Paul.
 
got back to the office today and my printer was there. brought it home. unpacked looks good. one of the adjusting nuts had popped off so had to reassemble that. and no power supply . am I surprised. NO. the listing said no accessories I guess the power supply is considered an accessory. so off to solid-doodle to order a new one.
and drop shipped the order to printed solid so there is filament everywhere on the floor. So will not have my filament til next week. Looks like no test prints this weekend.
the cost of a replacement sheet of Kapon form SD is $ 20 not going to do it. a 8 x 8 x1/4 borosilicate glass from McMaster Carr $25 I will probably go for it.

Tin
 
Rod, I have ordered cheap bearings off eBay in the past, they were only small ones, but around 60cents each.

Paul.

Paul, Thanks, in a lot of 10, this listing comes in at 26 cents delivered (for 625ZZ 5mm IDx 16mm OD x 5mm Wide)
http://www.ebay.com.au/itm/10-PCS-R...faultDomain_15&var&hash=item1e8bc11cd3&_uhb=1

I'll see how I go making the wheels
solid-wheel-kit-3.jpg


The dimensions are metric but they must have used imperial units hence the really odd dimensions. They have another design that adds a V slot on the flat of the wheel so it will run on a V rail as well as the slot but this one just rides in the V shaped channel which is what I want.

Here is the other one

V_wheel_kit_delrin_diag.jpg
 
I will have to look up the soliddoodle printer. What nozzle size does it have, and does it have a heated build platform?
You are better off with the borosilicate glass. Just use elmers glue stick for a bonding layer with the color fabb. with abs you need to make yourelf some juice.
The first layer is the most important, if your printer isn't properly calibrated to get that first layer stuck you will have all kinds of problems.
 
.4 m nozzle.
looks like I need to order the glass. yes yes heated platform.
Lookes like this unit a little used outline of what looks like nuts on the kaplon tape.
Tin
And thanks for the help.
 
Tin, Matt @ printed solid said if your near by you could swing over and he would give you a sample pack of filament to get you started while waiting on your order. Hes only 15 minutes from my house.
 
Just a small comment, i have much better adhesion to simple, cheap glass with simple water washable paper gluestick. I also bought an expensive borosilicate glass and it does not work so good. So before spending money, just buy simple windows glass. After printing, put glass in fridge for 2-3 minuttes and print will remove itself
 
A1 have playing phone tag With Matt. We finally connected I work only a couple minutes from the DM bridge so will connect with him after work tomorrow.

HLS may try the window glass. but have the MC catalog number in pocket.
the power supply is on its way. One way or another should be pretty much together by Monday.
again thanks for the help and encouragement.
Tin
 
OOOOH the wait.

Power supply will arive Monday. Argh. In the mean time decided to try the window glass and picked up binder clamps hair spray and stick glue as well leveled the bed and set the z limit to park the nozzle 0.060 inches from the bed plate per mats suggestion. A small roll of pla in hand. from Printed solid.
Downloaded a couple files from thiniverse.
Tin
 
Tin, It must surely be frustrating. I have all but given up buying second hand tools on eBay because invariably there is always something wrong or misdescribed.

I guess I better stop posting about building on a shopping thread but this is what I achieved.

2d892bdc-0983-4f4b-88bf-9173a3265e1a_zpsae6defde.jpg


You can see I set the drawing up so the grooves could be cut with an SNMG 90 degree tool and then be parted off in exactly the same position after centre drilling.

After parting off, I held the parts in a collet chuck with a collet stop to cut the bearing seat. I found I had to seat the bearing before cutting the seat on opposite side as the stop was too small a diameter. I used a boring bar that came with my boring head to cut the seat as my lathe tooling was too big for this kind of work. The bearings were hard to get out, so I only cut seats in one wheel.

There were two problems I encountered with this approach.
1. The turned diameter was not constant.
2. Getting a reference point exact again after changing tools to part off.

So the wheels shown are probably good for drawer runners etc but maybe not for precision liner parts without shimming etc.

I had a bit of a play afterwards with the tool memories in my DRO and finally worked out how they worked. I think if I can get them sorted out, I would get more accurate and repeatable results by changing tools on the DRO, cutting one wheel at a time and making a custom back stop for the collet chuck that engaged with the outer edge of the wheel.

I will say the Acetal (Delrin) was nice to machine in comparison to the HDPE I usually use.
 
Back
Top