Boring head Ball/Radius turner

Home Model Engine Machinist Forum

Help Support Home Model Engine Machinist Forum:

This site may earn a commission from merchant affiliate links, including eBay, Amazon, and others.

rodw

Well-Known Member
Joined
Dec 2, 2012
Messages
1,146
Reaction score
340
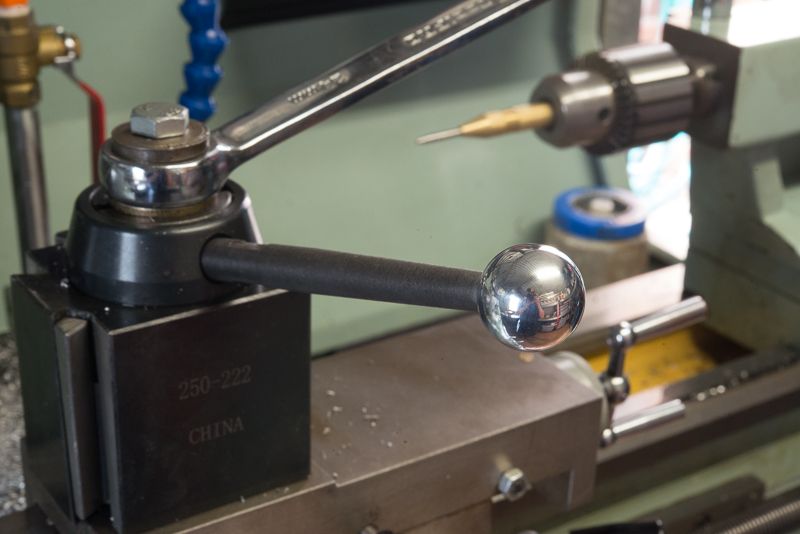
There seems to be heaps of threads on ball turners on the forum but not much said about using a boring head to do this. So here is one set up to fit on a BXA tool post.

DSC_4987_zpsf4bb0bed.jpg


DSC_4988_zps8f5e206d.jpg


DSC_4997_zps072a4b91.jpg


DSC_4990_zps8d10acce.jpg


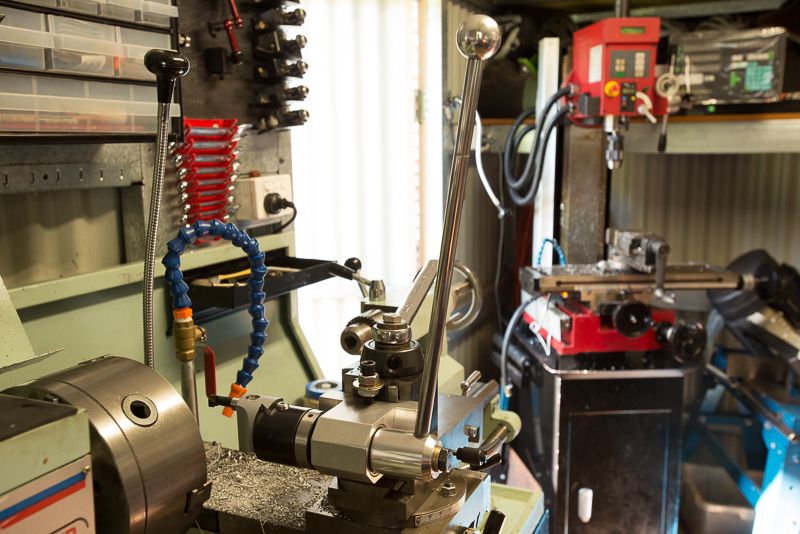
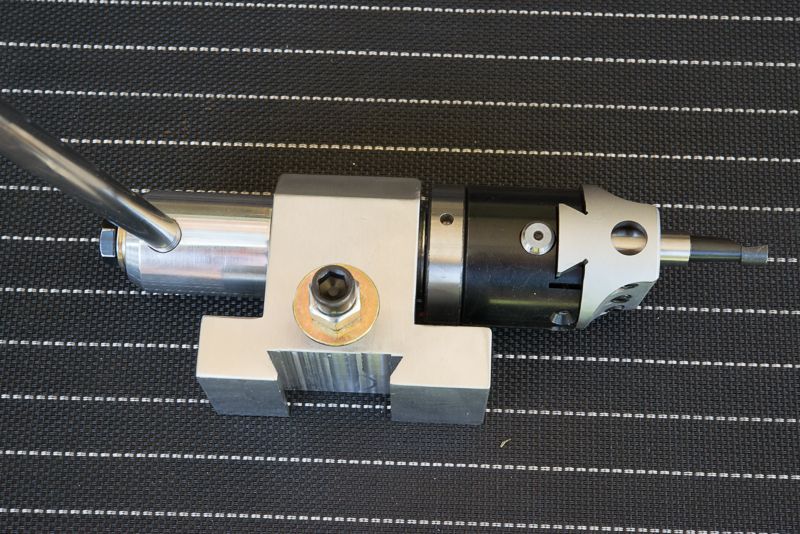
When I bought my boring head, I bought an additional straight shank mounting flange for it. It had a 20mm diameter shaft. I bought a pair of 42mm x 20mm x 12mm bearings which only cost $5.50 each. The body is made of aluminium (from 50mm x 100mm flat bar) and the handle is 12mm steel. I found some plans online but I had to redo them as they were for a CXA tool post.

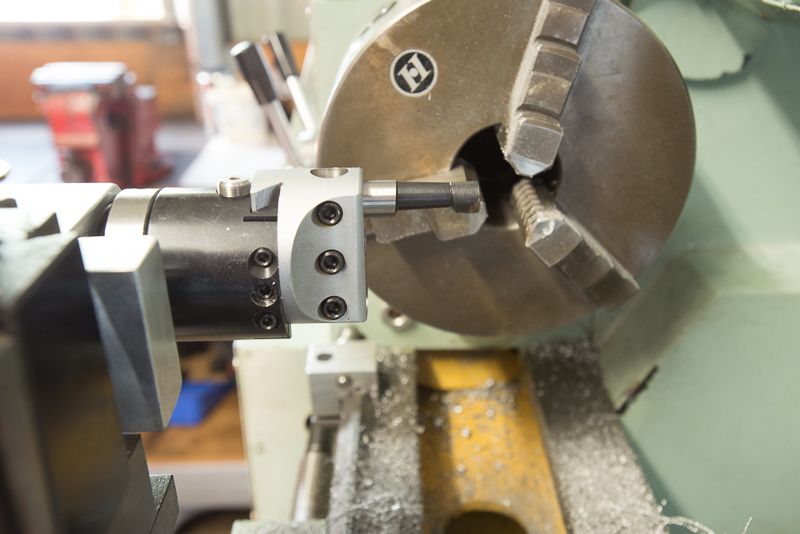
I improvised with the height adjustment over the weekend for now and used a washer sandwiched between two nuts and I was able to centre it OK. You only need to do this once and is pretty easy. It is just a matter of adjusting the height until the tool touches the top and bottom of a piece of round stock in the chuck.

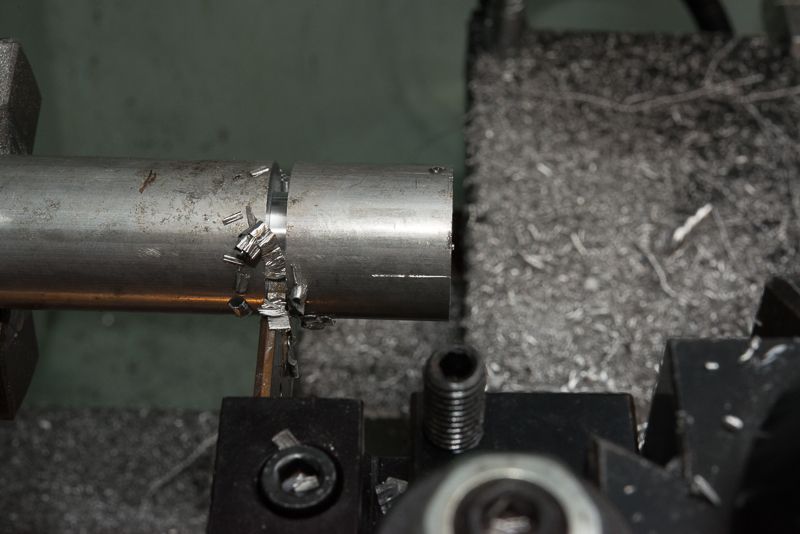
So drill and tap the end of some bar stock, part off the piece so it is the same length as the diameter and go for it!

DSC_5005_zps1a2e7311.jpg


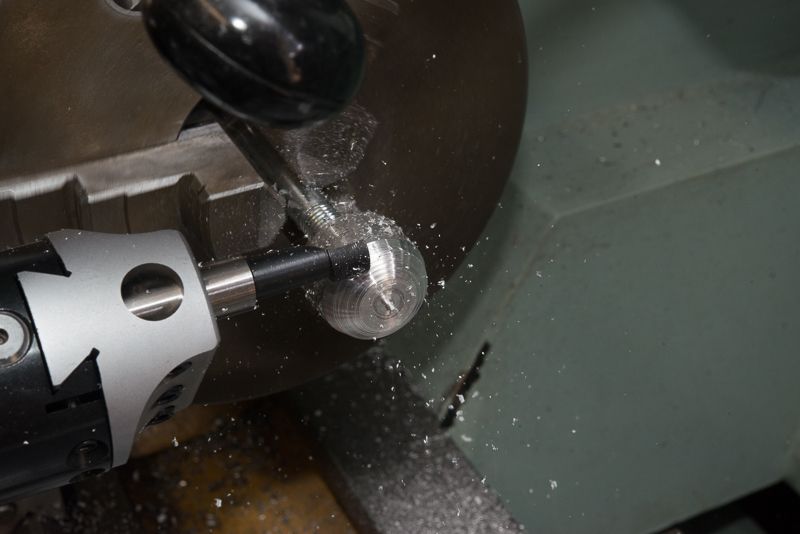
Just wind the tool in gently and take your time with small cuts.

DSC_5011_zpsc82de401.jpg


DSC_5012_zps0682da56.jpg


DSC_5014_zps0f309b98.jpg


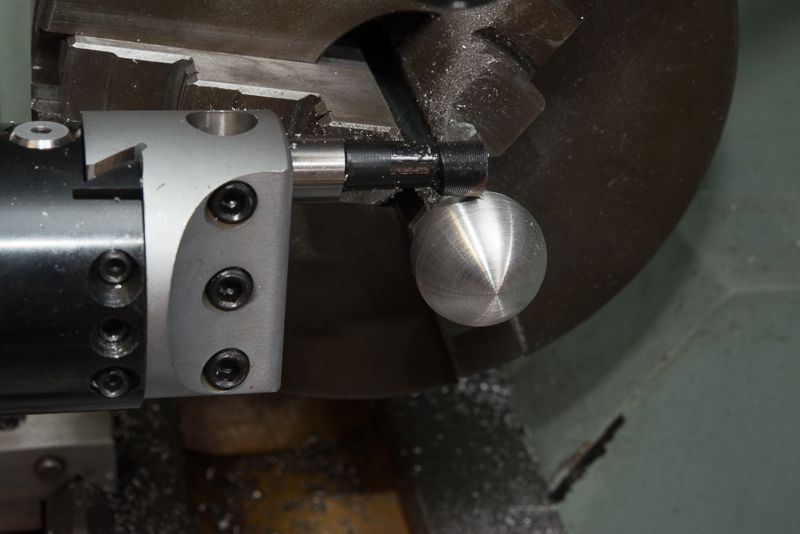
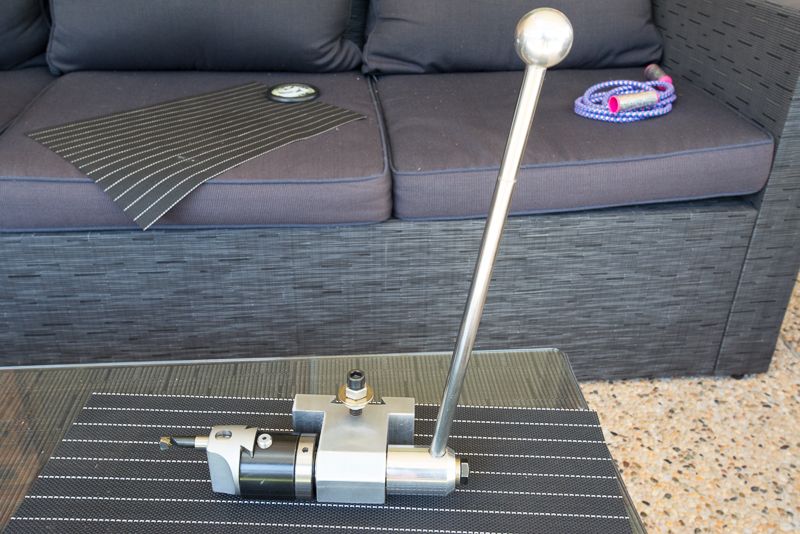
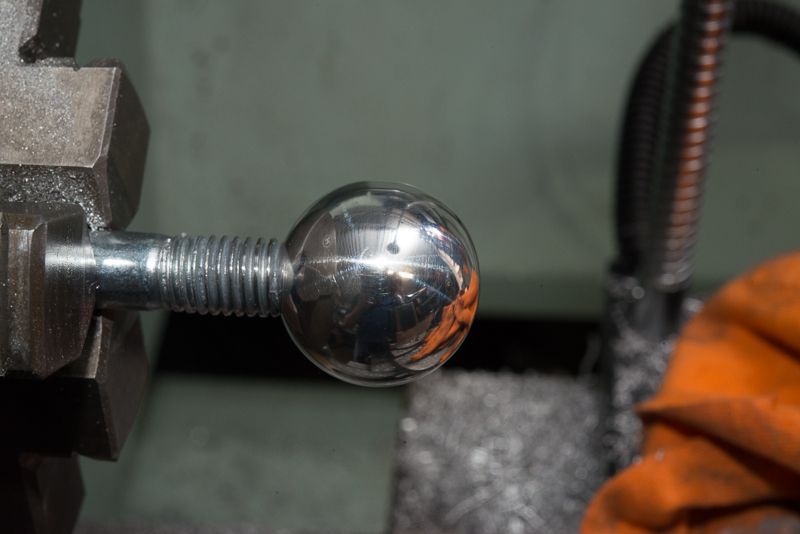
Umm... loosen the ball before you polish it as it was very hard to get a grip to unthread it from the mandrel (just use any old bolt the right thread)

DSC_5017_zps21bc823f.jpg


Beautiful!

To polish it, with the lathe running at 500 rpm, I started with 240 grit sandpaper and moved up to 400 wet and dry kept wet with some kerosene. Then moved up to 600, 800 and 1000 grit (with kero) before the final polish with Autosol metal polish which you should be able to get from a car accessory store. Looks like chrome!

DSC_5018_zps30554b5b.jpg


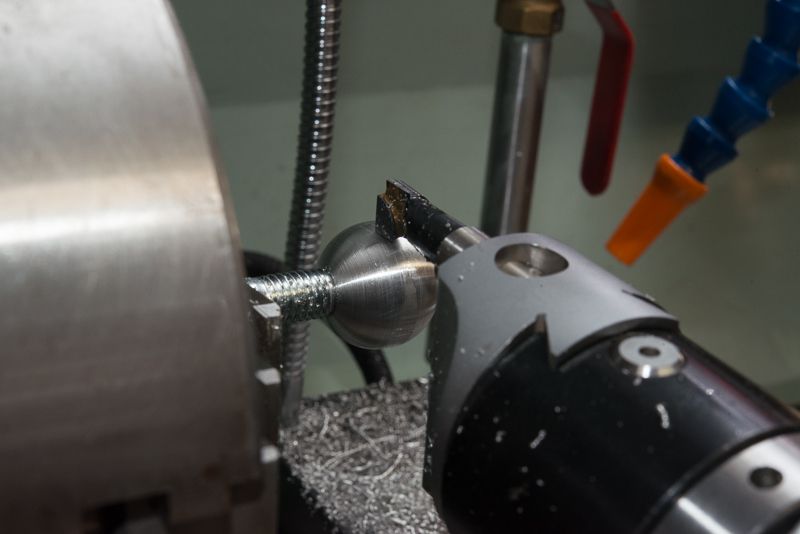
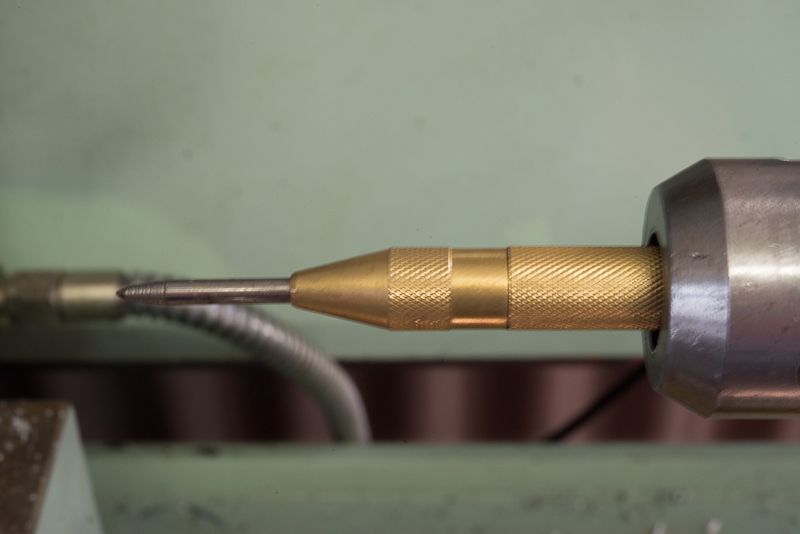
Oh and another tip I learnt somewhere, maybe even on this forum. When tapping a thread in a lathe or mill, remove the anvil from a self punching centre punch and use it to hold the tap centred.
DSC_5003_zps8e9f72d4.jpg


this really works treat and the tool can be returned to normal (but as I had 2, I cut a ring around one with the lathe) so I know which one is what.
 
I was so impressed with this post, I spent the day making the parts to make my version of your ball/radius turner. I have made a tool holder for my OXA QCTP, and a straight shank adapter for my 2" boring head.
May I be so bold as to ask for a video of yours in action?
Thanks for an inspirational post!

Chuck
 
  • Like
Reactions: KLG
I was so impressed with this post, I spent the day making the parts to make my version of your ball/radius turner. I have made a tool holder for my OXA QCTP, and a straight shank adapter for my 2" boring head.
May I be so bold as to ask for a video of yours in action?
Thanks for an inspirational post!

Chuck

Chuck,

I am humbled by your blind adoption of my idea...I am glad you liked it! Just one thing that you might like to consider. If you look at the pictures you will see I drilled a hole in the shank adapter to me it easy to undo the boring head as I can insert an allen key in the hole to undo it! It was easy with the adapter held in a collet in a collet block!

I have looked at various threads on ball turners and thought they were an enormous amount of work but when I saw this design, I was really impressed how simple it was but it still took a day and a half (and the rest of the second day to make and polish the first ball!)

It is a bit of a pain to set up my DSLR to shoot video in my shed but I put my little old SD video camera on the charger tonight but won't make any promises.
 
I wouldn't say blind, Rob, needing glasses, maybe, LOL. Mine will not be an exact copy, but functionally the same.
I need to study up on making a bearing pocket, have 2 to make on the tool block. I'll post pictures if It comes out.
I would appreciate any kind of video, thanks for trying.

Chuck
 
Last edited:
Very nice design. It shouldn't need bearings though. Bushings should be more than adequate for this mechanism.----Brian
 
Brian, I intend to use the tool block as a cross drilling platform as well as for the ball turner. The shaft that holds my adapter for the boring head is threaded for 3/8" x 24 tpi, so the adapter can be swapped for a drill chuck. I havent worked out the handle end yet, but it will also be the drive end for the drill rig.

Chuck
 
Brian, I intend to use the tool block as a cross drilling platform as well as for the ball turner. The shaft that holds my adapter for the boring head is threaded for 3/8" x 24 tpi, so the adapter can be swapped for a drill chuck. I havent worked out the handle end yet, but it will also be the drive end for the drill rig.

Chuck[/QUOTE
Chucketn--Most drills I have seen use bushings as well. It certainly won't hurt to have ball bearings there. I just don't know as they give any advantage over bushings.---Brian
 
I'm interested in all techniques, Brian. Would I need oil ports if I used bushings? I have brass rod big enough to make bushings from, I think.

Sorry to hijack, Rod.

Chuck
 
I'm interested in all techniques, Brian. Would I need oil ports if I used bushings? I have brass rod big enough to make bushings from, I think.

Sorry to hijack, Rod.

Chuck
chuck--I would recommend oilite bronze, not brass. I know we all use brass in our model engines for bushings, and they are really not subjected to heavy loading, so they work all right. To build an arbor or tool head with a revolving shaft, ,bronze is the most wear resistant material. Oilite bronze bushings are best, because they are porous and filled with lubricating oil. They don't really need an oil port, although again, an oil port won't be detrimental to them.
 
The ACE hardware I deal with has a small selection, MSC and the others have lots. For something used like this would be, slow, infrequent, I'd put a dab of grease on the bushings, and suggest the grandkids can do it again in 20 years.
 
No, but any of the industrial bearing supply houses carry them in just about any size you can dream up. You can also order them on-line. I have an old Boston Gear catalogue here that lists a bunch of different sizes. Do a web search--just be sure to specify Oilite bronze. Don't buy 660 bronze, because it doesn't have the self lubricating properties.
http://www.isostatic.com/index.html
http://www.symmco.com/
 
Last edited:
I thought about making a bush from bronze and the body from steel but my supplier would have had to get the bronze in when the ally merchant and bearing suppliers are almost on my doorstep. The cost was also lower!

I thought seating bearings and getting them aligned would be a good learning experience and an excuse to use my coaxial dial indicator to line up the second side. I drilled through to 22mm and bored out to 28mm just for fun! I cut the pockets the depth of the bearings. The first one, I made a bit too loose but I snuck up on the tolerance the second time round and it was a hammer fit. The loose one, I glued in with some locktite 609. I clamped it and left it overnight and all was good in the morning.

As far as the handle went, that was easy, I put a washer at the front so the flange had clearance against the bearing outer race. The shaft then sat in about 3mm from being flush with the bearing on the back side. The shaft had a 10mm thread for a drawbar.

I machined up the handle hub with a through hole and a step in the mating surface on the bearing side. The first 2mm is the same diameter as the shaft to locate the handle snug and the next 1mm was the same size as the bearing inner race for clearance again so it did not bind. I just bolted the hub to the shaft and it is tight enough not to move and this also removed any lateral play in the bearings. I found I needed to take light cuts so there is not that much pressure on the handle.

Given you are making your spindle, maybe you can slot the end of the shaft and add a tongue on the handle end so you get positive drive. You could then bolt on a smaller hub you could put in your drill chuck when drilling.

The handle I decided to angle out 10 degrees for fun but this was not necessary. I bolted the hub to a piece of threaded round stock and held it in a 5C collet block in the milling vice with an angle block to set the angle. I also used this fixture in the lathe to polish the hub before drilling and tapping for the handle.

I will be interested to see how yours turns out and how you incorporate the drilling fixture. I don't think I need this as I can drill holes on the mill. I think it would be easy to make up a sleeve that pushes through the bearing to use as a drilling guide rather than add the chuck.

Some people make up a boring bar with a reversed insert cutter but the cheap brazed tipped bar I used works OK even if you do cut in the reverse direction.

Hope the extra info helps.
 
Thanks for the input, Rod. I had to make a couple of design changes today, as the assembled length with the boring head and adapter is too long. May have to take a bit off the tool block also. It will still be useable, though.

Chuck
 
Thanks for the input, Rod. I had to make a couple of design changes today, as the assembled length with the boring head and adapter is too long. May have to take a bit off the tool block also. It will still be useable, though.

Chuck

Good to hear you are making progress. If you look carefully, mine is not symetrical to gain as much room as I could get by moving the head backwards.

Here is a video for you.

http://youtu.be/gnt2DIcrWYk
 
Very nicely done Rod! Hope I can do as well! Great video!

Chuck

Thanks, glad you liked the video. I think it will be the last from me for a while as I dropped my little camcorder after I took this video and it died! :mad:

Just when i worked out a nice simple way to mount it above the lathe too!

Don't forget you owe me a couple of photos too!
 
Sorry about your camcorder, I didn't mean for you to break it! Off to the shop to work on my version...
Thanks again for the inspiration and taking the time to make a video!

Chuck
 
I modified some of my parts for my version of Rodw's ball cutter, but still no joy. Here's my parts so far.
As you can see from the second pic, I'm still approx. 3/8" from being able to center the cutter. I'll remake the adpter, and there is room to take maybe 3/16" off the front of the tool block. Even with the compound topslide reversed and cranked to it's limit I can't reach center. And, that is wth the7x travel mod.

Chuck

DSCF0121.jpg


DSCF0123.jpg
 
Last edited:
I could also make a custom cutter from drill rod, but I think that would limit the size of ball that could be turned.
Chuck
 

Latest posts

Back
Top